

AppSource is like an app store for your Microsoft products and there is a certification process which your product has to go through before it can be available in there. Last year I worked with getting a product through the certification process and this year on the 15th of March it was finally approved and published. Now that I am familiar with the process, I thought I could share my findings.
Update 27th of June 2020: The ISV program was changed in July 2019. Read about the Microsoft Business Applications ISV Connect Program and how the Could Partner Portal now belongs to the history chapters here in my new article.
This will be a series of three blog posts. In this first one I will go though the overall process, in the second I will let you in on the details regarding creating the AppSource package and in the third and last one I will summarize my findings and share conclusions, tips and tricks.
AppSource is the premier destination to market and distribute your apps, content packs, and add-ins—all backed by a brand that billions of customers already know and trust. Showcase your apps that work with Dynamics, Office, Power BI, Azure, and more.

The overall process
The process of getting an app certified and available on AppSource consists of several different steps. Below a summary is shown and after that the different steps are presented on a somewhat more detailed level. Please note that the whole next blog post will be dedicated to the part where you create the AppSource package (including the Dynamics 365 package and verification using the Package Deployer tool.).
- Make sure you are a member of the Microsoft Partner Network (MPN)
- Register to become a publisher
- Create a managed solution of your product
- Create a Dynamics 365 package
- Create an AppSource package
- Make sure you have an Azure account
- Create a blob storage account in Azure
- Download Microsoft Azure Storage Explorer
- Upload the AppSource package to the storage account
- Generate SAS (Shared Access Signature) information
- Create a new offer in the Cloud Partner Portal
- Publish your offer
- Let the evaluation begin! Micosoft will get back to you
- Fix things
- Upload a new AppSource package
- Hopefully Microsoft lets you know your offer has passed the evaluation
- Perform a functional demo for Microsoft
- Microsoft will do some steps, activating workflows they call it
- You will get to do a preview of your app’s page on AppSource
- You activate the offer
- Time to celebrate, your app is now published on AppSource!

Where to start
In order to be able to send in a product for evaluation you need to be a member of the Microsoft Partner Network (MPN), if you are not you need to become one and then you start here.
You also need to become a publisher, which you register for here. Once you have signed up you will get an e-mail from Microsoft telling you what to do next and guiding you through the rest of the certification process.

Creating the AppSource package
Now you are a member of the MPN and a publisher. The next step is to build your AppSource package. This step will require some work. My next blog post will go further into the details of this step, for now let me present it on a higher level.
It all starts with a managed solution of your app. If you come from the Dynamics 365 CE or Dynamics CRM world, then this step is a piece of cake for you. Then you are already familiar with the fact that a solution gathers all the components needed for your product and once you have exported it as a managed solution, then you are done with this step.
An AppSource package basically is a .zip file, which contains your managed solution bundled together with other files. You will need to be familiar with the process of creating a Dynamics 365 package as such a package is a part of the AppSource package. The below picture describes the files that builds up an AppSource package.

As you can see it includes an icon file. Do not run directly to the marketing department of your company asking for a new icon though (or start the process of creating one of your own), instead be aware of that this is not the only icon you will need. At a later stage you will register your offer in the Cloud Partner Portal and that process will require some more icons. Perhaps you want to structure your work and create all those icons at the same time. 😉
You can read more about each and one of the different pieces here.
Creating a Dynamics 365 package
A Dynamics 365 package is a package that is created in order to be deployed with the Package Deployer tool. These kinds of packages and this tool is not something newly invented to be used for AppSource though. It has been here for a while and can be used separate from AppSource for packaging and deploying products built on Dynamics 365.
In the AppSource case you just create the package and the tool is never separately used for deployment, rather downloading from AppSource uses the same technique. However you can utilize the tool in order to verify your package.
Genereally speaking this technique is used for packaging a solution and migration data (sample data for your product) into a file that can be deployed with the Package Deployer tool. For the migration/sample data part Data Migration Tool is used. You also have the possibility to include custom code which should be run before, while, or after the package is deployed to the Customer Engagement apps instance.
As already mentioned, by running the Package Deployer tool you can verify your package before you put it together with the other files that builds up your AppSource project and test the installation part before you submit your offer to Microsoft.
What to do with your AppSource package
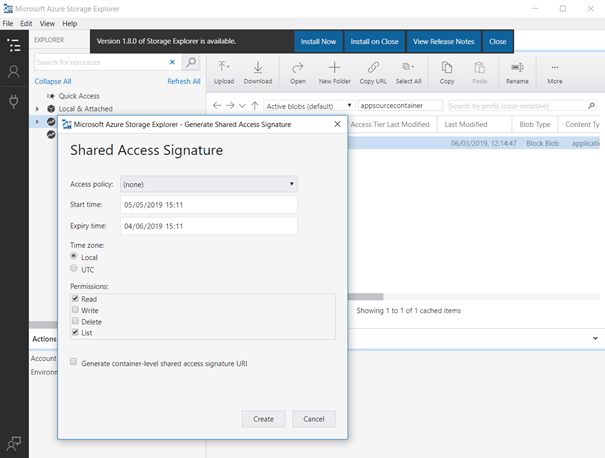
When you have created your AppSource package, the next step is to store it on Azure Storage. You will need an Azure account for this step. Once you have an Azure account you create a Blob Storage Account in Azure. Then you use Microsoft Azure Storage Explorer, connect to your Azure Storage Account and upload your AppSource package.
The last step is to generate SAS (Shared Access Signature) information, in order for Microsoft to be able to pick up your package. This is a URL which will be used in a later stage when you submit your offer on Cloud Partner Portal.
You can read all about the details regarding the storage procedure here.
Submit an offer
After Microsoft lets you become a publisher you will be able to sign in to the Cloud Partner Portal. That is the place where you submit your offer. So when you have uploaded your AppSource package and generated SAS information, you go simply to the Cloud Partner Portal and you choose to create a new offer.
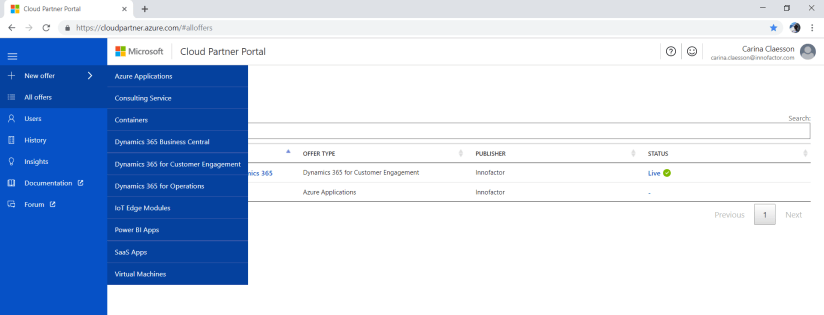
Then you fill in all the information which is asked for, it is really a lot of information. Do not think you are done with the work as soon as you have created your AppSource package and have stored it in an Azure Storage account, because then you will be disappointed. 😊 It takes some time to gather all things you need in order to submit your offer. I will descibe this in a later blog post.
The offer has been submitted – now what?
After you have submitted your offer it is an iterative process where Microsoft evaluates your product and lets you fix the things they believe should be fixed. The evaluation includes basic things as making sure the AppSource package is put together and structured in the correct way as well as a code review.
When you have passed the evaluation step, you will get to do a demo for Microsoft, to present the included functionality and answer all kinds of questions, both on a functional level as well as on a technical level. If approved, some more steps are required, performed by Microsoft though, and then you will get to do a preview of your product page on AppStore.
If you are satisfied with how the product page looks in preview mode, you get to push a magic button and the next thing you know it your product is available on AppSource.

This is the first blog post of three. In the next I will let you in on the details regarding creating an AppSource package, including creating and verifying a package with the Package Deployer tool.
Until next time, if you cannot wait to read more about this subject, following this link is a great start. Publish your app on AppSource.

Hi, thank you for the suggestion. Just to make sure I got it right.
I need to all this step to add my solutions or apps in AppSource?
Make sure you are a member of the Microsoft Partner Network (MPN)
Register to become a publisher
Create a managed solution of your product
Create a Dynamics 365 package
Create an AppSource package
Make sure you have an Azure account
Create a blob storage account in Azure
Download Microsoft Azure Storage Explorer
Upload the AppSource package to the storage account
Generate SAS (Shared Access Signature) information
Create a new offer in the Cloud Partner Portal
Publish your offer
Let the evaluation begin! Micosoft will get back to you
Fix things
Upload a new AppSource package
Hopefully Microsoft lets you know your offer has passed the evaluation
Perform a functional demo for Microsoft
Microsoft will do some steps, activating workflows they call it
You will get to do a preview of your app’s page on AppSource
You activate the offer
Time to celebrate, your app is now published on AppSource!
LikeLike
Hi Andi,
Those are the steps. But perhaps your app will pass the evaluation the first time and then you do not need the step to fix things after you have submitted your offer. 🙂 Microsoft is guiding you through the whole process, as soon as you have registered to become a publisher Microsoft will assist you along the way.
LikeLike
Sweet blog! I found it while surfing around on Yahoo News.
Do you have any suggestions on how to get listed in Yahoo News?
I’ve been trying for a while but I never seem to get there!
Many thanks
LikeLike
Hello, this article is fantastic! It looks like there may be a few updates we can make based on changes to the process. If you’re interested in collaborating, I’m happy to make suggestions and share resources. Just shoot me an email please. Thanks, Brian
LikeLike
Hello Brian, Thank you! I know that last year the new Business Applications ISV Program was launched and that if you had a Cloud Partner Portal account with one or more offers you could enroll with the new program and get your account migrated to Partner Center. I also know there are new terms and conditions and “Revenue Sharing” related to this new program, but I have not investigated it more in detail. It sounds great to collaborate. I’ll send you an e-mail. Thanks, Carina
LikeLike